Wednesday, October 2, 2013

Addition to the "Sea" Life series

I enjoyed creating "Sea" Life #1 & 2 so much, I wanted to add to the collection. Pam Hobbs, a studio artist in the Studios of Key West, asked me to participate with her in a show currently being held there. Delighted to be asked, I thought "Sea" Life #3 would be fun piece to show.

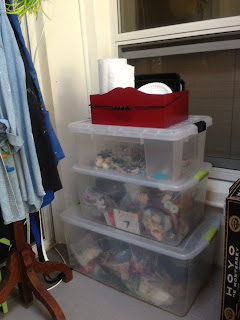
Yes, I have a lot of "stuff" to look through and use when I am making my pieces.
 They are all in boxes and bins waiting for their turn to be recycled into a new life in my artwork.


Check out the show, EX Pose-TSKW Artists & Friends Sept. 19- Oct. 11
600 White Street, Key West.

Also see the amazing work of Pam Hobbs at http://www.hobbsart.freeservers.com/


Wednesday, September 25, 2013

Assembling the Assemblage

In creating a new sculpture I usually come up with a general idea or feeling I want to bring into the piece. Then the hunt and collection begins to find what may go into it. 

I then look for the combination of shapes that feel most inviting to me that can hold the various object that will tell my story.

After rummaging through my stash of objects, treasures and finds, my story emerges.
"Sea" Life #1


"Sea" Life #2


Currently both of these pieces are being shown and are available at the Key West Art Center.

Thursday, June 20, 2013

Art Camp 2013


In my last post I wrote about wanting to continue learning. This past week I approached that a little differently and taught at an art camp here in Key West. Since I had never done anything like this before,
it was quite an experience.


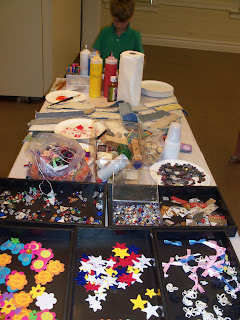
Being an assemblage artist, I wanted to share my thoughts with them about using found objects and utilizing them as "art supplies". After suggesting how they can re-purpose items by examining their texture and the shape, and showing them some ideas to get started, I let them loose in a box of recycling and assorted embellishments that I had brought in for them to explore.


We put together recycling with tape into interesting head shapes and shrink wrapped them together. After covering with colored tissue paper, paint and embellishment, the kids had quite an assortment of quirky creatures!

 Stamping with everyday objects onto recycled denim makes great bracelets.


 After sharing with them one of my art pieces, I gave them their own cigar boxes and let them do their thing.
So after 6 afternoons with 6 kids between the ages of 8 and 12, I have to say I did learn some things:

  • kids love to make a mess especially splattering paint
  • don't micro manage them, it's more fun to just watch their imaginations fly
  • have a lot of projects in mind as they want to know what they are going to do next before they are done with the task at hand.
  • I totally understand why it is that God has young woman have children. I am exhausted!
The kids enjoyed themselves, and so did I. In fact, I am going to do it again next week!


Friday, June 7, 2013

The Artist's Way

In my opinion, one of the secrets to being ageless is to continue learning. I use the term ageless, because it feels to me as a more realistic approach to trying to feel "young".  Since time is man made, my age doesn't mean anything (except in the morning when I wake up and feel stiff and it takes awhile to get moving).  In recent conversation with a friend, we both agreed that we have so many things that we want to learn, to do, or to try we will never be bored, just may run out of time.


With these thoughts in mind, at the beginning of this year I started a journey of deeper self discovery. I made a commitment to myself to take a class pursuing higher creativity. It is based on the book the Artist's Way, A Spiritual Path to Higher Creativity by Julia Cameron. I say it was a commitment because it is a 12 week course with a meeting each week, a book to read and tasks to preform. I wasn't quite sure what I was going to get out of it, but I was very curious. I found a class being held locally and facilitated by an acquaintance, so I thought "just do it". I'm glad I did and would recommend it for anyone regardless of age. The weekly meetings were enjoyable, the reading very thought provoking, the tasks were achievable or I just selected not to do them, but what I learned was life changing.

What can be taken from this class is surely different for each student. Basically what it does is put you in touch with the power of your internal creativity. It makes you be aware of your own destructive behaviors, helps you remove negative thoughts you have about yourself and teaches you to nurture yourself.  It is very interesting what you discover by just doing 2 of the class commitments which are morning pages and artist's dates.

Morning Pages--each morning you write 3 long-hand written pages of whatever comes into your mind (likes, dislikes, dreams, regrets). It becomes a form of meditation and clarifies your thoughts.
Artist's Date--once a week you do something by yourself. You receive answers in the solitude and learn that it is okay to be kind to oneself.

We are all creative, it is a life force that we all have the ability to experience. So while this class did not remove any wrinkles, it is helping me be ageless by being more confident and encouraging me to express my own style. I want to live "artfully" and try to do so everyday. More about that in future posts.

In the meantime, check out these wonderful women:

www.advancedstyle.blogspot.com


Wednesday, April 17, 2013

I Did It!!

I had set a goal for my self to move my studio into my new space within a 2 week period. After a lot of work and help from my hubby, my goal has been achieved.
 I enjoy designing and decorating. In my last post I was considering painting my tile floor. The job turned out to be not as daunting as I thought. Sanding, priming and painting took a little over 2 days. The hard part was waiting 72hrs before walking on it. For the most part, I am very pleased with the results. I can see that the floor will not take much abuse. I already have a few scratches, but it is what it is and sure looks a lot better then before we started this project.
 I enjoy a space that nurtures my creativity. Having favorite things around me in jars and objects on shelves, inspires me. I do like organization. Not being able to find something when I need it drives me crazy.   Anyone care to share some organization tips?
  Now some photos of the finished product. Let me know what you think.
I have get busy making something!


Wednesday, April 3, 2013

OMG it has been awhile!

     I know, I disappeared for awhile, and I apologize. It has been a crazy year, which I will go into more detail in following posts, but I'm not going to bla bla bla on this blog. Time to focus and move forward!
     The palace space is moving. I'm not going very far, just from a small bedroom to a semi-outdoor space in the center of the house which will now be my studio. With one end open to our backyard, I will get to make my magic with an inspirational view of the water. Why didn't I think of using this space before? One afternoon my friend Sheila came over to join me in a messy project. It was a beautiful day so we worked in this space so we could spread out. After she left, I thought what fun (I think this often after spending time with her), why don't I just move out here? And so it started!  I have a goal. I want to be in this space in 2 weeks! Nothing like setting goals to get me moving.
     After scrapping off as much of the old paint from the cement walls that I could, I primed the walls and painted it an off white. My hubby told me it was going to be really bright, and it is, so I calmed it down with a very light blue ceiling. That technique is used a lot down here in Key West on the ceiling of porches. I think it has something to do with mosquitoes thinking it is the sky. You get to know a lot of little tidbits like this while taking tourist friends on local tours. Back to the painting...after several trips to Home Depot for supplies, several coats of paint and a slight mishap of a can hitting me in the head and twisting my glasses, it looks pretty good!
    The next step is dealing with the ugly floor. It's part gross red tile and part cement. My brilliant idea is to etch the cement to match the tile squares and then paint it all one color. The Home Depot guy is shaking his head at me, my hubby is shaking his head at me, and I am paying no attention to either one of them. My thought is that it has to look better than ugly red tile and after I bring in all my stuff, how is going to look at the floor?
    I'll post photos of my progress and let you decide if I made a good choice.


Monday, April 30, 2012

Menu Monday (7) Baked Manicotti

This past Saturday we had a meeting of our Cayo Hueso dinner club at our home. It's a monthly get together of eating and drinking and good conversation with friends. I arranged an Italian team of baked manicotti, chicken marsala, green beans with mint and garlic and lots of red wine of course! Our friends always include the apps etc to round out the meal. The chicken recipe and marinara sauce used to top the manicotti have been on previous posts.

Do you call your marinara, tomato sauce, or gravy? I call it sauce, but that's my choice since that was what it was called in our home growing up.To me gravy is brown, white or au jus, sorry, I digress, back to my manicotti which is to die for, worth the calories and melt in your mouth.  Making your own shells makes all the difference, is not hard and makes you look like a genius! It's like making a crepe with a cheese filling. I made the shells and filling the day before, then rolled and baked them before my guests arrived. This is my Mom's recipe, a family secret, but I will share it with you (o:


BAKED MANICOTTI (SERVES 8 TO 10)

shells:
5 eggs
1 1/4 cups unsifted all purpose flour
1/4 teasp salt

filling:
 combine all ingredients:
2lbs ricotta cheese
1pkg (8oz) mozzarella (diced or shreaded)
1/3 cup parmesean cheese
1 tblsp chopped parsley]1 teasp salt
1/4 teasp pepper
2 eggs.

Make shells: in a bowl combine all shell ingredients with 1/1/4 cups water and mix with a portable mixer until smooth.  Melt 1 teasp butter in 7" skillet ( I use a Teflon type pan and just use butter for the 1st pour). Pour 2 tblsp (or more) batter rotating pan quickly to spread batter evenly over the bottom of the pan.. Cook over medium heat until the top is dry but bottom is not brown, Cool on wire rack and then stack with waxed paper in between each shell until you are ready to bake.

Preheat oven to 350 degrees
 Cover the bottom of your baking dish with a small amount of  sauce. Place 1/4 cup filling in each shell and roll up. Place shells seam side down in a single layer and top with sauce and parmesean cheese and bake till bubbly.

Enjoy!!